

Plexiglass, also known as acrylic sheets, opens up a world of possibilities for crafting enclosures, signs, and displays. Whether you’re a seasoned DIY enthusiast or just starting your creative journey, this guide will enable you to cut plexiglass with precision and confidence. Understanding the nuances of this material is key to bringing your ideas to life.
Plexiglass’s applications are vast, from protective enclosures to eye-catching signs. Yet, the importance of proper cutting techniques cannot be overstated.
In this beginner-friendly guide, we’ll explore the essential tools, step-by-step instructions, and valuable tips to ensure your plexiglass projects are not only successful but also enjoyable. So, grab your tools, and let’s dive into the art of cleanly shaping plexiglass for your unique creations!
Tools You’ll Need
While crafting plexiglass, you should have the right tools in hand. These are not just any tools; they are the key to turning your ideas into tangible, beautifully cut projects. Here are some essential instruments you’ll want to have at your crafting station:
- Scoring Tool: This specialized instrument is designed for the precise cutting of plexiglass, ensuring clean lines and controlled results.
- Straightedge: A steadfast companion, the straightedge guarantees that your cuts stay true and accurate, laying the foundation for professional-looking creations.
- Glass Cutter or Box Cutter: Ideal for making straight, controlled cuts, providing an alternative to the scoring tool.
- Circular Saw, Saber Saw, Table Saw, or Jigsaw: For tackling curves and more complex cuts, these power tools offer versatility in shaping your plexiglass creations
With these tools at your disposal, you’re not just crafting; you’re sculpting your vision into reality. Let’s move into the art of plexiglass cutting and bring your projects to life!
How to Make Straight Cuts On Plexiglass
Making clean, straight cuts is essential for many plexiglass projects. Here are a few methods for making precise straight cuts.
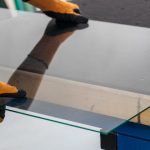
Scoring Tool
Mark your desired cutting line on the plexiglass sheet with a permanent marker. Use a straightedge as a guide.
Position the scoring tool against the cutting line at a 45-degree angle and apply firm, even pressure as you drag it across the plexiglass surface. Make multiple passes over the cutting line to deepen the score.
Place the scored line just over the edge of a table. Use your hands to apply downward pressure on both sides of the score, snapping the plexiglass apart.
Smooth any rough edges by sanding the cut edges lightly with fine sandpaper.
Utility Knife
Protect your work surface by putting down a piece of scrap wood. Tape the plexiglass sheet to the wood on both sides of your marked cutting line.
Use a straightedge as a guide as you score the plexiglass surface with a sharp utility knife. Make several passes applying firm, even pressure.
Follow steps 3-4 above to snap the plexiglass along the score and smooth the edges.
Table Saw
For long straight cuts, a table saw with a fine-toothed blade is the most precise option.
Keep the plexiglass sheet stable and feed it through the blade slowly to achieve a perfect cut. A clamp can help reduce vibration.
Sand and polish the cut edges lightly to remove any marks from the saw blade.
With the proper tools and technique, you can cut straight cuts in plexiglass for custom enclosures, display cases, and more.

How To Make Curve Cuts On Plexiglass
Cutting curved shapes and lines in plexiglass requires specialized tools and techniques to prevent cracking the material. When making curves, it’s best to use power saws designed for tight turns and smooth cuts.
Before getting started, be sure to protect your work surface and secure the plexiglass sheet with clamps to keep it steady throughout the process.
Scroll Saw
Mark your desired curve on the plexiglass sheet and drill small starter holes along the inside of the line. This allows the scroll saw blade to turn easily along the curved path.
Clamp the plexiglass securely to the saw table and insert a fine-toothed scroll saw blade.
Carefully follow your marked line, gently turning the plexiglass as you cut. Let the scroll saw do most of the work – don’t force the blade. The starter holes will allow smooth turning.
Jig Saw
For wider curves, a jigsaw with a specialized plastic-cutting blade works well. As with the scroll saw, clamp the plexiglass to your work table and mark the cutting line, drilling starter holes.
Cut slowly along the curve, keeping the jigsaw base flush with the plexiglass for control.
Use gradual turns, not sharp angles, to prevent cracking. A smooth cutting motion is key when jigsawing curved plexiglass.
Band Saw
Finally, for long swooping curves, a band saw can achieve professional results. Clamp the plexiglass securely and feed it slowly through the blade following your marked cut line.
Use a narrow blade and a steady feed rate for the best control. Tight turns can cause cracks, so keep curves gradual.
No matter which saw you use, be sure to sand the cut edges evenly when finished to smooth out any rough saw marks.
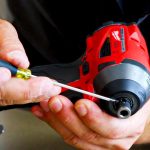
How To Drill Holes On Plexiglass
Start by marking the desired hole locations on your plexiglass sheet using a marker or center punch. Tape the plexiglass to a scrap piece of wood as backing support before drilling. This prevents cracking on the back side as the drill bit penetrates the material.
Select a standard twist drill bit that is designed for plastics. Carbide-tipped bits also work well for plexiglass. Apply light pressure at the start, letting the drill bit cut into the surface slowly. Once the hole is started, you can apply more pressure, but avoid forcing the drill or overheating, which can cause cracking around the holes.
Drill your holes at slow or moderate speed. High speeds are not necessary for plexiglass and may melt the plastic instead of cutting it cleanly. Take your time and let the drill bit do the work.
For larger holes, make a pilot hole first with a smaller bit, then enlarge it to the final size with successive bits. Clamping the plexiglass during drilling helps control vibration and prevents cracking. Never drill holes near the edges or in very thin plexiglass.
Minimize friction and heat by periodically lifting the bit from the hole and clearing any shavings. Lubricating the drill bit with light oil will also allow smoother cutting action.
Finish by cleaning circular saw marks around holes with fine sandpaper. Deburr the entrance and exit holes carefully with a file or deburring tool to prevent cracked edges. With the right approach, you can drill clean, precise holes in plexiglass for screws, tubing, or other attachments.
How To Polish Edges Of A Plexiglass
Start by sanding the edges that need polishing. Use progressively finer grit sandpaper, starting with a medium/fine grit and ending with a super fine grit like 600 or 800. Sanding will remove any saw marks or roughness from cutting.
Next, clean and dry the edges thoroughly. Use isopropyl alcohol to remove all oil, grease, and debris left over from sanding. Buff the edges with a clean, dry cloth.
Apply a plastic polish compound to the edges using a clean, soft cloth. Rub the polish into the plexiglass with gentle, circular motions. Use minimal pressure. The polish will help smooth very fine scratches and restore clarity.
For a high gloss finish, use a buffing wheel or rotary tool with a buffing pad attachment. Apply polishing compound to the pad and buff the edges at low speed. Keep the wheel moving constantly to avoid heat buildup.
Finish by cleaning off any remaining polishing compound with a dry cloth. You can also use a plastic cleaner to remove residues and polish away any final haze on the edges.
Inspect the edges for any remaining scratches or uneven areas. Repeat sanding and polishing if needed to achieve a clear, polished finish.
With some elbow grease, you can restore and polish the cut edges of plexiglass to a like-new condition. Proper polishing removes fine scuffs and scratches, bringing back the transparent optical clarity.
Wrapping Up
Working with plexiglass sheets opens up many possibilities for creative DIY projects. By following the proper techniques for scoring, sawing, drilling, and polishing, you can achieve clean, professional-looking results.
With practice and patience, you’ll master the nuances of cutting and polishing this versatile material. Your custom plexiglass creations will have crisp edges, smooth curves, and crystal-clear clarity.
So don’t be intimidated to take on that next plexiglass project. Arm yourself with these cutting, drilling, and polishing tips and make something amazing out of this unique plastic.
Frequently Asked Questions (FAQ’s)
How do I cut plexiglass at home?
Ans: The easiest way to cut plexiglass sheets at home is using a fine-toothed hand saw. Mark your cut lines, clamp plexiglass securely to a work table, then cut slowly and steadily along the lines. Ensure your blade is angled between 5-10 degrees for clean cuts.
What tools do I need to cut acrylic plexiglass sheets?
Ans: Basic tools to cut plexiglass are a ruler, pencil, clamps, a sheet of wood to protect your work surface, safety goggles, and a saw suited for acrylic like a table saw, jigsaw, miter saw, or circular saw using a fine finish blade. A drill can also be used to create holes.
What is the best way to cut plexiglass smoothly?
Ans: For smooth plexiglass cuts, a table saw is the best and gives you straight, clean, professional cuts. Use a finishing blade with 80+ teeth. Take it slow allowing the blade to cut through instead of cracking the plexiglass. Keep water handy during cuts.
Can I cut plexiglass with household tools?
Ans: Yes, basic household tools like a hobby knife, razor blade, or snips can cut thin plexiglass sheets under 1/8” thick. Score lines multiple times with the blade then snap plexiglass on the scored line. For thicker plexiglass, invest in power saws.
How should I prepare the plexiglass prior to cutting?
Ans: Before cutting, wipe sheets clean using a microfiber cloth, measure and mark cut lines on the protective film instead of directly on the plexiglass, secure sheets with clamps to your workbench, equip your safety goggles, and ensure your blade is sharp for clean cuts.


Leave a Comment